前言
正所谓只要功夫深,铁杵磨成针,坚持不懈,水滴石穿。学习也要坚持不懈,慢慢积累,才能达到以量变促成质变。在前进的过程中也要保持好良好的心态,不急不燥,脚踏实地,一步一个脚印。
工厂方法模式 介绍
工厂方法模式(Factory Pattern)是一种创建型设计模式,是日常开发中使用频率较高的一种设计模式。下面就要我们一起去了解一下工厂方法设计模式。
工厂方法设计模式 定义
定义一个用于创建对象的接口,让子类决定实例化哪一个类。工厂方法使一个类的实例化延迟到其子类。
工厂方法设计模式 使用场景
- 工厂方法模式是new一个对象的替代品,所以在有需要生成对象的地方都可以使用,但是要慎重的考虑当前任务是不是需要增加一个工厂类进行管理,避免使自己的代码更加复杂。
- 需要灵活、可扩展的框架时,可以考虑采用工厂方法模式。
工厂方法设计模式 通用UML类图
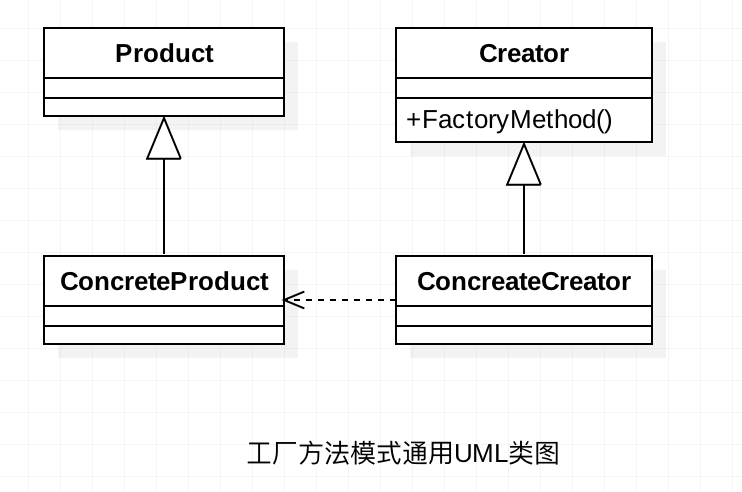
说明:
Product
产品类的抽象方法,由具体的产品类去实现。
ConcreateProduct
具体的产品类,可以有多个。继承于Product
Creator
抽象工厂类,负责定义产品对象的产生。
ConcreateCreator
具体的工厂实现类,继承于Creator。
工厂方法模式使用实例
前面我们组装了一台台式机电脑,现在台式机电脑组装好了,但是还不能使用,我们需要在电脑上安装软件系统,但是软件系统无非就是电脑系统的安装(linux系列,windows系列,mac系列(黑苹果)等等)、各个硬件驱动程序的安装。
我们可以将每一种安装的电脑系统及驱动作为一个产品类,在抽象类中定义操作的方法。
下面就以此为例,实现工厂方法模式。
抽象产品类。
1234567891011121314151617181920212223242526272829303132333435363738394041424344454647484950515253545556575859606162636465package com.yf.designpatternandroid;/*** Created by yangfei on 16/8/15.* yangfei's computer.*/public abstract class InstallSoftware {/*** 安装系统** @param systemOs 系统*/public abstract void installSystem(String systemOs);/*** 安装显卡驱动** @param GPUType 显卡型号*/public abstract void installGPUDriver(String GPUType);/*** 安装主板驱动** @param mainBoxType 主板型号*/public abstract void installMainBoxdriver(String mainBoxType);/*** 安装网卡驱动** @param netCardType 网卡型号*/public abstract void installNetCardDriver(String netCardType);/*** 安装声卡驱动** @param audioType 声卡型号*/public abstract void installAudioDriver(String audioType);/*** 安装USB驱动* @param usbDriverType(3.0,2.0,...)*/public abstract void installUSBDriver(String usbDriverType);/*** 安装键盘驱动* @param keyBoardType 键盘型号*/public abstract void installKeyBoardDriver(String keyBoardType);/*** 安装鼠标驱动* @param mouseType 鼠标型号*/public abstract void installMouseDriver(String mouseType);/*** 软件系统安装完成* @return*/public abstract String finish();}
具体的产品Windows系统的电脑。
1234567891011121314151617181920212223242526272829303132333435363738394041424344454647484950515253package com.yf.designpatternandroid;/*** Created by iuni.life on 16/8/15.* yangfei's computer.* 具体的逻辑就不处理了*/public class WindowsSoftware extends InstallSoftware {public void installSystem(String systemOs) {//系统下载安装处理}public void installGPUDriver(String GPUType) {//显卡驱动下载安装处理}public void installMainBoxdriver(String mainBoxType) {//主板驱动下载安装处理}public void installNetCardDriver(String netCardType) {//网卡驱动下载安装处理}public void installAudioDriver(String audioType) {//声卡驱动下载安装处理}public void installUSBDriver(String usbDriverType) {//USB驱动下载安装处理}public void installKeyBoardDriver(String keyBoardType) {//键盘驱动下载安装处理}public void installMouseDriver(String mouseType) {//鼠标驱动下载安装处理}public String finish() {return "You can use normal Windows PC";}}具体的产品类,Ubuntu系统的电脑。
12345678910111213141516171819202122232425262728293031323334353637383940414243444546474849505152package com.yf.designpatternandroid;/*** Created by iuni.life on 16/8/15.* yangfei's computer.*/public class UbuntuSoftware extends InstallSoftware {public void installSystem(String systemOs) {//系统下载安装处理}public void installGPUDriver(String GPUType) {//显卡驱动下载安装处理}public void installMainBoxdriver(String mainBoxType) {//主板驱动下载安装处理}public void installNetCardDriver(String netCardType) {//网卡驱动下载安装处理}public void installAudioDriver(String audioType) {//声卡驱动下载安装处理}public void installUSBDriver(String usbDriverType) {//USB驱动下载安装处理}public void installKeyBoardDriver(String keyBoardType) {//键盘驱动下载安装处理}public void installMouseDriver(String mouseType) {//鼠标驱动下载安装处理}public String finish() {return "You can use normal Ubuntu PC";}}具体的产品类,Mac 系统的电脑。
12345678910111213141516171819202122232425262728293031323334353637383940414243444546474849505152package com.yf.designpatternandroid;/*** Created by iuni.life on 16/8/15.* yangfei's computer.*/public class MacSoftware extends InstallSoftware {public void installSystem(String systemOs) {//系统下载安装处理}public void installGPUDriver(String GPUType) {//显卡驱动下载安装处理}public void installMainBoxdriver(String mainBoxType) {//主板驱动下载安装处理}public void installNetCardDriver(String netCardType) {//网卡驱动下载安装处理}public void installAudioDriver(String audioType) {//声卡驱动下载安装处理}public void installUSBDriver(String usbDriverType) {//USB驱动下载安装处理}public void installKeyBoardDriver(String keyBoardType) {//键盘驱动下载安装处理}public void installMouseDriver(String mouseType) {//鼠标驱动下载安装处理}public String finish() {return "You can use normal MacOs PC";}}抽象工厂类。
123456789package com.yf.designpatternandroid;/*** Created by iuni.life on 16/8/16.* yangfei's computer.*/public abstract class Factory {abstract <T extends InstallSoftware> T getComputer(Class<T> clz);}工厂类的具体实现。
1234567891011121314151617181920212223242526272829package com.yf.designpatternandroid;/*** Created by iuni.life on 16/8/15.* yangfei's computer.*/public class ComputerFactory extends Factory {/*** 利用反射方式生产具体的产品对象** @param clz* @param <T>* @return*/public <T extends InstallSoftware> T getComputer(Class<T> clz) {InstallSoftware installSoftware = null;try {installSoftware = (InstallSoftware) Class.forName(clz.getName()).newInstance();} catch (InstantiationException e) {e.printStackTrace();} catch (IllegalAccessException e) {e.printStackTrace();} catch (ClassNotFoundException e) {e.printStackTrace();}return (T) installSoftware;}}
场景类。
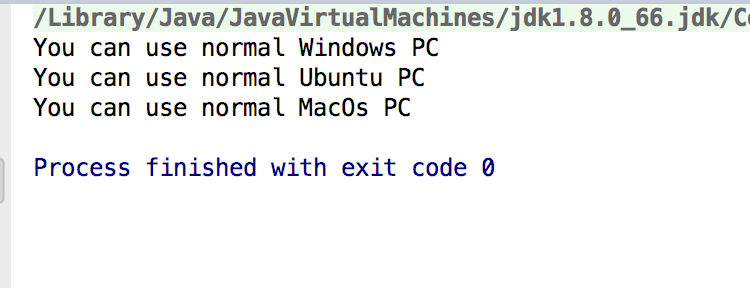
123456789101112131415161718192021222324252627282930313233343536373839404142package com.yf.designpatternandroid;/*** Created by iuni.life on 16/8/15.* yangfei's computer.*/public class Client {public static void main(String[] args) {//现在生产一批windows系统的电脑//这里举例子说明,具体驱动就不一一列举了.ComputerFactory computerFactory = new ComputerFactory();WindowsSoftware windowsSoftware = computerFactory.getComputer(WindowsSoftware.class);windowsSoftware.installSystem("Windows 10");windowsSoftware.installAudioDriver("Windows AudioDriver");windowsSoftware.installGPUDriver("Windows GPUDriver");windowsSoftware.installKeyBoardDriver("Windows KeyBoardDriver");windowsSoftware.installMainBoxdriver("Windows MainBoxdrive");windowsSoftware.installMouseDriver("Windows MouseDriver");windowsSoftware.installNetCardDriver("Windows NetCardDriver");windowsSoftware.installUSBDriver("Windows USBDriver");System.out.println(windowsSoftware.finish());//现在要生产一批Ubuntu系统的电脑UbuntuSoftware ubuntuSoftware = computerFactory.getComputer(UbuntuSoftware.class);//Ubuntu系统一般只要安装好系统就可以ubuntuSoftware.installSystem("Ubuntu 14.04");System.out.println(ubuntuSoftware.finish());//现在又要生产一批Mac(黑苹果)系统的电脑MacSoftware macSoftware = computerFactory.getComputer(MacSoftware.class);//黑苹果安装就有点繁琐了,首先要找驱动什么的,替换原有驱动等等,如果对黑苹果有兴趣,可去远景论坛爬贴学习.//黑苹果应该是先把找好的驱动什么的融入到安装系统中,然后才开始安装mac系统macSoftware.installAudioDriver("Mac AudioDriver");macSoftware.installGPUDriver("Mac GPUDriver");macSoftware.installKeyBoardDriver("Mac KeyBoardDriver");macSoftware.installMainBoxdriver("Mac MainBoxdriver");macSoftware.installMouseDriver("Mac MouseDriver");macSoftware.installNetCardDriver("Mac NetCardDriver");macSoftware.installUSBDriver("Mac USBDriver");macSoftware.installSystem("Mac Os 10.11.6");System.out.println(macSoftware.finish());}}运行结果。
工厂方法模式的优缺点
优点
良好的封装性,代码结构清晰:
不需要知道对象的创建过程,降低模块间的耦合。
工厂方法模式的拓展性非常优秀:
在增加产品类的情况下,只要适当修改具体的工厂类或者拓展一个工厂类,就可以拥抱变化。例如在我们的例子中需要生产一个装radHat的系统的电脑,则只需要增加一个RedHatSoftware类,工厂类不需要做任何修改就可以完成系统拓展。
屏蔽产品类:
产品类的任何变化,调用者都无需关心,它只要关心产品的接口。
典型的解耦框架:
高层模块只需要知道产品的抽象类,其他的实现类无需关心,符合迪米特原则,我们不需要的就不要去交流,符合依赖倒置原则,只依赖产品的抽象,符合里氏替换原则,使用产品子类替换产品父类,当然也没有问题。
缺点
类结构的复杂化:
每次为工厂方法模式添加新的产品时就要编写一个新的产品类,还要引入抽象层。
工厂方法模式的拓展
工厂方法模式一般有4种拓展,分别为简单工厂模式、升级为多个工厂类、替换单例模式、延迟初始化。
下面我们详细说明这4个拓展。
简单工厂模式(静态工厂模式)
如果一个模块仅需要一个工厂类,使用静态方法就可以,所有我们把上诉工厂类的具体实现(ComputerFactory)里的方法改为静态就可以了:
123456789101112131415161718192021222324252627/*** Created by iuni.life on 16/8/15.* yangfei's computer.*/public class ComputerFactory{/*** 利用反射方式生产具体的产品对象** @param clz* @param <T>* @return*/public static <T extends InstallSoftware> T getComputer(Class<T> clz) {InstallSoftware installSoftware = null;try {installSoftware = (InstallSoftware) Class.forName(clz.getName()).newInstance();} catch (InstantiationException e) {e.printStackTrace();} catch (IllegalAccessException e) {e.printStackTrace();} catch (ClassNotFoundException e) {e.printStackTrace();}return (T) installSoftware;}}说明:
上诉代码与原有相比,有2处变化,一处是去掉了Factory抽象类,一处是把getComputer设为静态方法。
场景类也要做一些适当变化:
123456789101112131415161718192021222324252627282930313233343536373839404142/*** Created by iuni.life on 16/8/15.* yangfei's computer.*/public class Client {public static void main(String[] args) {//现在生产一批windows系统的电脑//这里举例子说明,具体驱动就不一一列举了.WindowsSoftware windowsSoftware = ComputerFactory.getComputer(WindowsSoftware.class);windowsSoftware.installSystem("Windows 10");windowsSoftware.installAudioDriver("Windows AudioDriver");windowsSoftware.installGPUDriver("Windows GPUDriver");windowsSoftware.installKeyBoardDriver("Windows KeyBoardDriver");windowsSoftware.installMainBoxdriver("Windows MainBoxdrive");windowsSoftware.installMouseDriver("Windows MouseDriver");windowsSoftware.installNetCardDriver("Windows NetCardDriver");windowsSoftware.installUSBDriver("Windows USBDriver");System.out.println(windowsSoftware.finish());//现在要生产一批Ubuntu系统的电脑UbuntuSoftware ubuntuSoftware = ComputerFactory.getComputer(UbuntuSoftware.class);//Ubuntu系统一般只要安装好系统就可以ubuntuSoftware.installSystem("Ubuntu 14.04");System.out.println(ubuntuSoftware.finish());//现在又要生产一批Mac(黑苹果)系统的电脑MacSoftware macSoftware = ComputerFactory.getComputer(MacSoftware.class);//黑苹果安装就有点繁琐了,首先要找驱动什么的,替换原有驱动等等,如果对黑苹果有兴趣,可去远景论坛爬贴学习.//黑苹果应该是先把找好的驱动什么的融入到安装系统中,然后才开始安装mac系统macSoftware.installAudioDriver("Mac AudioDriver");macSoftware.installGPUDriver("Mac GPUDriver");macSoftware.installKeyBoardDriver("Mac KeyBoardDriver");macSoftware.installMainBoxdriver("Mac MainBoxdriver");macSoftware.installMouseDriver("Mac MouseDriver");macSoftware.installNetCardDriver("Mac NetCardDriver");macSoftware.installUSBDriver("Mac USBDriver");macSoftware.installSystem("Mac Os 10.11.6");System.out.println(macSoftware.finish());}}说明:
运行结果没有发生变化,而且调用者比较简单,缺点是工厂类的拓展比较困难,不符合开闭原则,但是它仍然是一个非常实用的设计模式。
升级为多个工厂类
我们在做一个比较复杂的项目的时候,所有产品类都放到一个工厂方法中进行初始化会使代码结构不清晰。例如:一个产品类有5个具体实现。每个实现类的初始化(不仅仅是new,初始化包括new一个对象,并对对象设置一定的初始值)方法都不相同,如果写在一个工厂方法中,势必会导致该方法巨大无比,这时我们把工厂方法模式升级为多个工厂类就可以解决这个问题,下面我们还是以上述案例为例,但是每个电脑安装的驱动版本不同。下面是修改后的简单的UML类图(方法全部省略了):
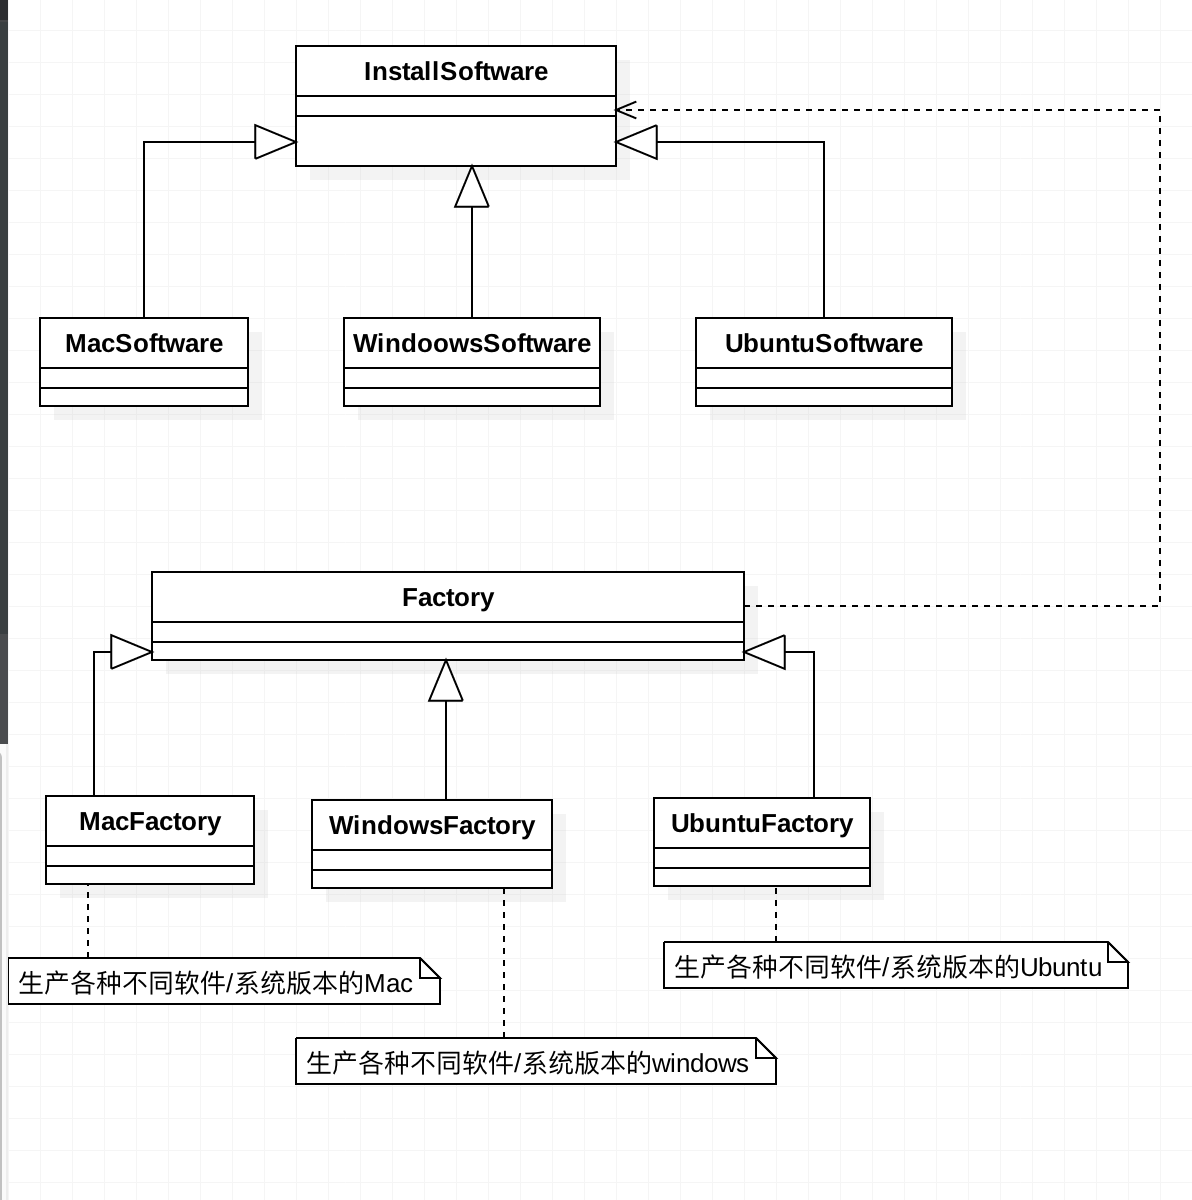
我们以生产不同软件/系统版本的windows电脑为例,其他2种实现方式一致。
其实就是在文章最开始的例子中把一个工厂类分成了3个工厂类,使其各个工厂各司其职,提升工厂产量。
Factory修改为
1234567/*** Created by iuni.life on 16/8/16.* yangfei's computer.*/public abstract class Factory {public abstract InstallSoftware getComputer();}增加WindowsFactory
12345678910/*** Created by yangfei on 16/8/16.*/public class WindowsFactory extends Factory {public InstallSoftware getComputer() {return new WindowsSoftware();}}场景类
1234567891011121314151617181920/*** Created by yangfei on 16/8/16.*/public class Client2 {public static void main(String[] args) {//这里举例子说明,具体驱动就不一一列举了.WindowsFactory windowsFactory = new WindowsFactory();WindowsSoftware windowsSoftware = (WindowsSoftware) windowsFactory.getComputer();windowsSoftware.installSystem("Windows 10");windowsSoftware.installAudioDriver("Windows AudioDriver");windowsSoftware.installGPUDriver("Windows GPUDriver");windowsSoftware.installKeyBoardDriver("Windows KeyBoardDriver");windowsSoftware.installMainBoxdriver("Windows MainBoxdrive");windowsSoftware.installMouseDriver("Windows MouseDriver");windowsSoftware.installNetCardDriver("Windows NetCardDriver");windowsSoftware.installUSBDriver("Windows USBDriver");System.out.println(windowsSoftware.finish());}}
说明:其他2种就不举例了,实现方式类似。实现各自的Factory使其继承自Factory抽象类。
替换单例模式
通过反射实现,下面举个例子:
- 单例类
123456789101112/*** Created by yangfei on 16/8/16.*/public class Singleton {//不允许通过new产生一个对象private Singleton() {}public void doSomething() {//业务处理}}- 负责生成单例的工厂类
12345678910111213141516171819202122232425262728293031323334import java.lang.reflect.Constructor;import java.lang.reflect.InvocationTargetException;/*** Created by yangfei on 16/8/16.*/public class SingletonFactory {private static Singleton singleton;static {try {Class c1=Class.forName(Singleton.class.getName());//获得无参构造Constructor constructor=c1.getDeclaredConstructor();//设置无参构造是可以访问的constructor.setAccessible(true);//产生一个实体对象singleton=(Singleton)constructor.newInstance();} catch (ClassNotFoundException e) {e.printStackTrace();} catch (NoSuchMethodException e) {e.printStackTrace();} catch (IllegalAccessException e) {e.printStackTrace();} catch (InstantiationException e) {e.printStackTrace();} catch (InvocationTargetException e) {e.printStackTrace();}}public static Singleton getSingleton() {return singleton;}}延迟初始化
何为延迟初始化(Lazy initialization)?一个对象被消费完毕后,并不立刻释放,工厂类保持其初始状态,等待再次被使用。延迟初始化是工厂方法模式的一个扩展应用,其通用类图如图如下所示。
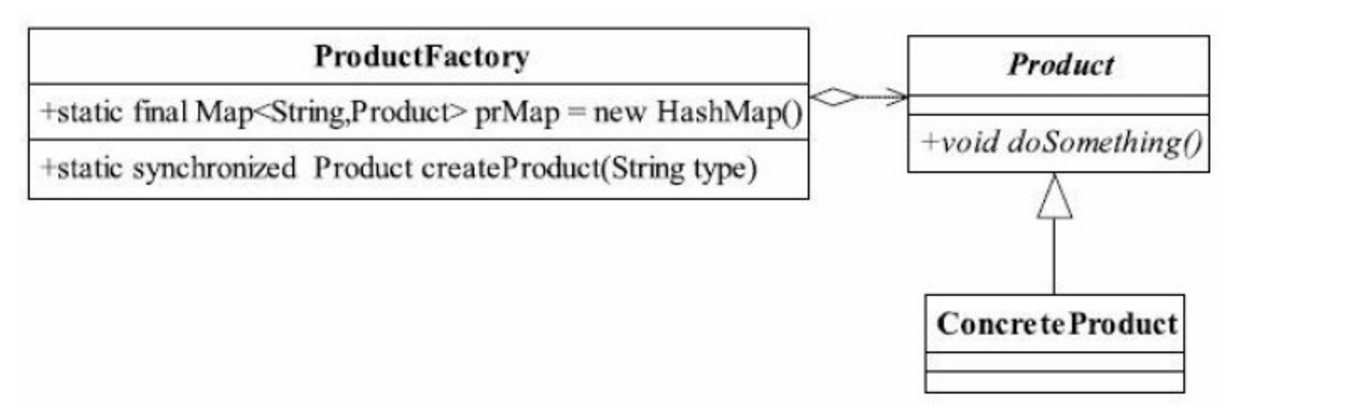
ProductFactory负责产品类对象的创建工作,并且通过prMap变量产生一个缓存,对需要再次被重用的对象保留,Product和ConcreteProduct是一个示例代码。ProductFactory如代码清单如下所示:
123456789101112131415161718192021public class ProductFactory {private static final Map<String, Product> prMap = new HashMap();public static synchronized Product createProduct(String type)throws Exception {Product product = null;// 如果Map中已经有这个对象if (prMap.containsKey(type)) {product = prMap.get(type);} else {if (type.equals("Product1")) {product = new ConcreteProduct1();} else {product = new ConcreteProduct2();}// 同时把对象放到缓存容器中prMap.put(type, product);}return product;}}通过定义一个Map容器,容纳所有产生的对象,如果在Map容器中已经有的对象,则直接取出返回;如果没有,则根据需要的类型产生一个对象并放入到Map容器中,以方便下次调用。
延迟加载框架是可以扩展的,例如限制某一个产品类的最大实例化数量,可以通过判断Map中已有的对象数量来实现,这样的处理是非常有意义的,例如JDBC连接数据库,都会
要求设置一个MaxConnections最大连接数量,该数量就是内存中最大实例化的数量。
延迟加载还可以用在对象初始化比较复杂的情况下,例如硬件访问,涉及多方面的交互,则可以通过延迟加载降低对象的产生和销毁带来的复杂性。
后记
文章不足之处,望大家多多指点,共同学习,共同进步。
参考资料
- <<设计模式之蝉>> 秦小波 著